Open Design Is Every Vibe Coder's Dream
A vibe-coder's playbook for Open Design — bring your own agent, pick a design system to kill AI slop, prompt for a structure that converts, and turn rough PRDs into a landing page, a mobile app, and a desktop app in minutes. Based on Sean Kochel's hands-on demos.
This guide is a vibe-coder’s playbook for Open Design: bring the agent you already use, pick a design system so your output doesn’t scream “AI generated,” prompt for a structure that actually converts, then iterate by conversation. It follows the three back-to-back builds Sean Kochel runs in his hands-on demos — a landing page, a mobile app, and a desktop app — rewritten and brought up to date with the current release. Watch the video above for the live run, or read on for the written version.
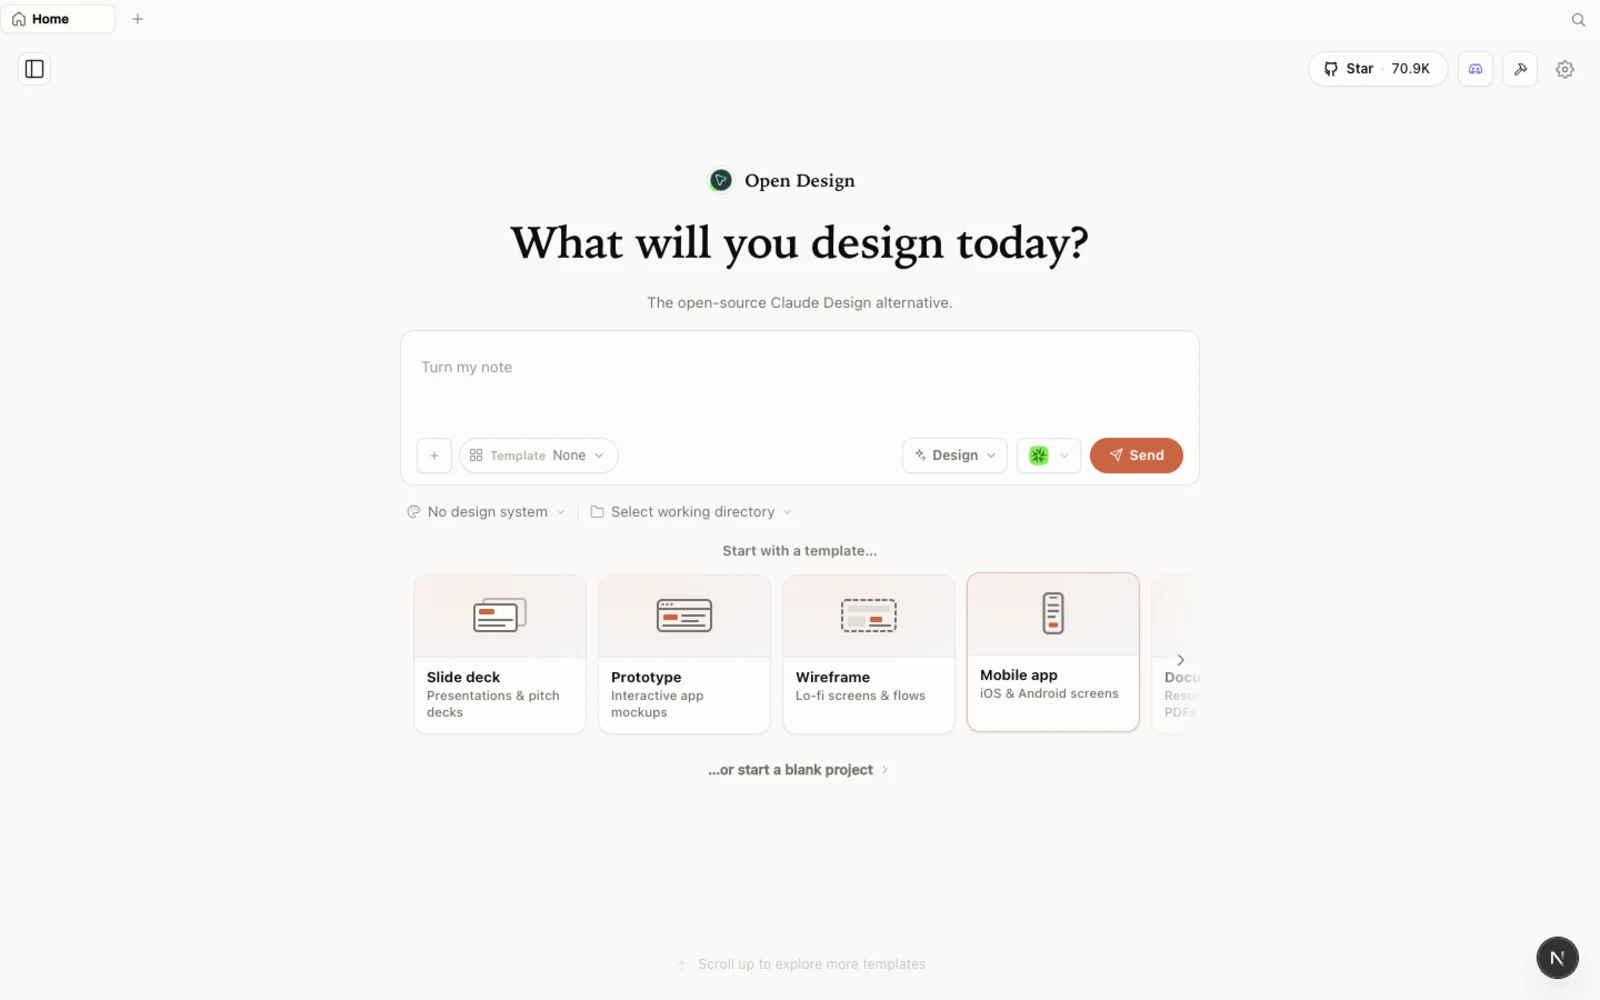 The Open Design workspace — prototypes, slide decks, images, and video in one calm, familiar canvas.
What is Open Design?
Open Design is an open-source, local-first design platform that runs on top of the coding agent you already use. It detects the CLIs already on your machine — Claude Code, Codex, Cursor, Gemini, Copilot, OpenCode, and a couple of dozen more — and lets that agent drive generation. As Sean puts it: there’s a CLI layer where you configure your agent, a system prompt that drives the quality, and then the parts that make it valuable — skill support and a deep library of design systems. The outputs are real HTML files, so whatever you make drops straight into your actual project.
Why vibe coders care:
- Bring your own agent and key — no second subscription, no provider lock-in.
- Runs locally — output is HTML you can lift straight into your codebase.
- Design systems kill the AI-slop look — start from a real brand instead of a blank canvas.
- Skills are customizable — drop in your own copywriting rules, UX paradigms, or processes.
- Open source, Apache-2.0 — read it, fork it, ship client work with it.
The two problems every vibe build runs into
Sean frames the whole workflow around two failure modes, and they’re worth naming because the rest of the playbook is how you avoid them:
- It looks like AI slop. Generic gradients, the same serif font, container soup — you don’t even like it yourself.
- It isn’t structured to do its job. A landing page that doesn’t convert, an app whose flow doesn’t make sense.
A design system solves problem one. A deliberate prompt with real structure solves problem two. Keep both in mind for every build below.
Step 1 — Install and pick your agent
You have three ways in:
| Path | Best for | Requirements |
|---|---|---|
| Desktop app | Most people — zero config | None. Just download and open. |
| Run from source | Developers who want to read or modify the code | Node ~24, pnpm 10.33.x |
| Install into your agent | People who live in the terminal | An existing coding-agent CLI |
The fastest path is the desktop app — grab it from open-design.ai/download; it auto-detects the agent CLIs already on your PATH. To run from source instead:
git clone https://github.com/nexu-io/open-design.git
cd open-design
corepack enable && pnpm install
pnpm tools-dev run web
Open the local URL it prints (it uses a dynamic port — don’t hardcode one). On first launch, point Open Design at the agent you want driving the work, or bring your own API key.
Step 2 — Build a landing page that converts
This is Sean’s first demo, and it’s the template for everything else:
- Pick a design system. In the demo he chooses Anthropic’s. This is your anti-slop guardrail — the agent inherits that brand’s palette, type, and component language.
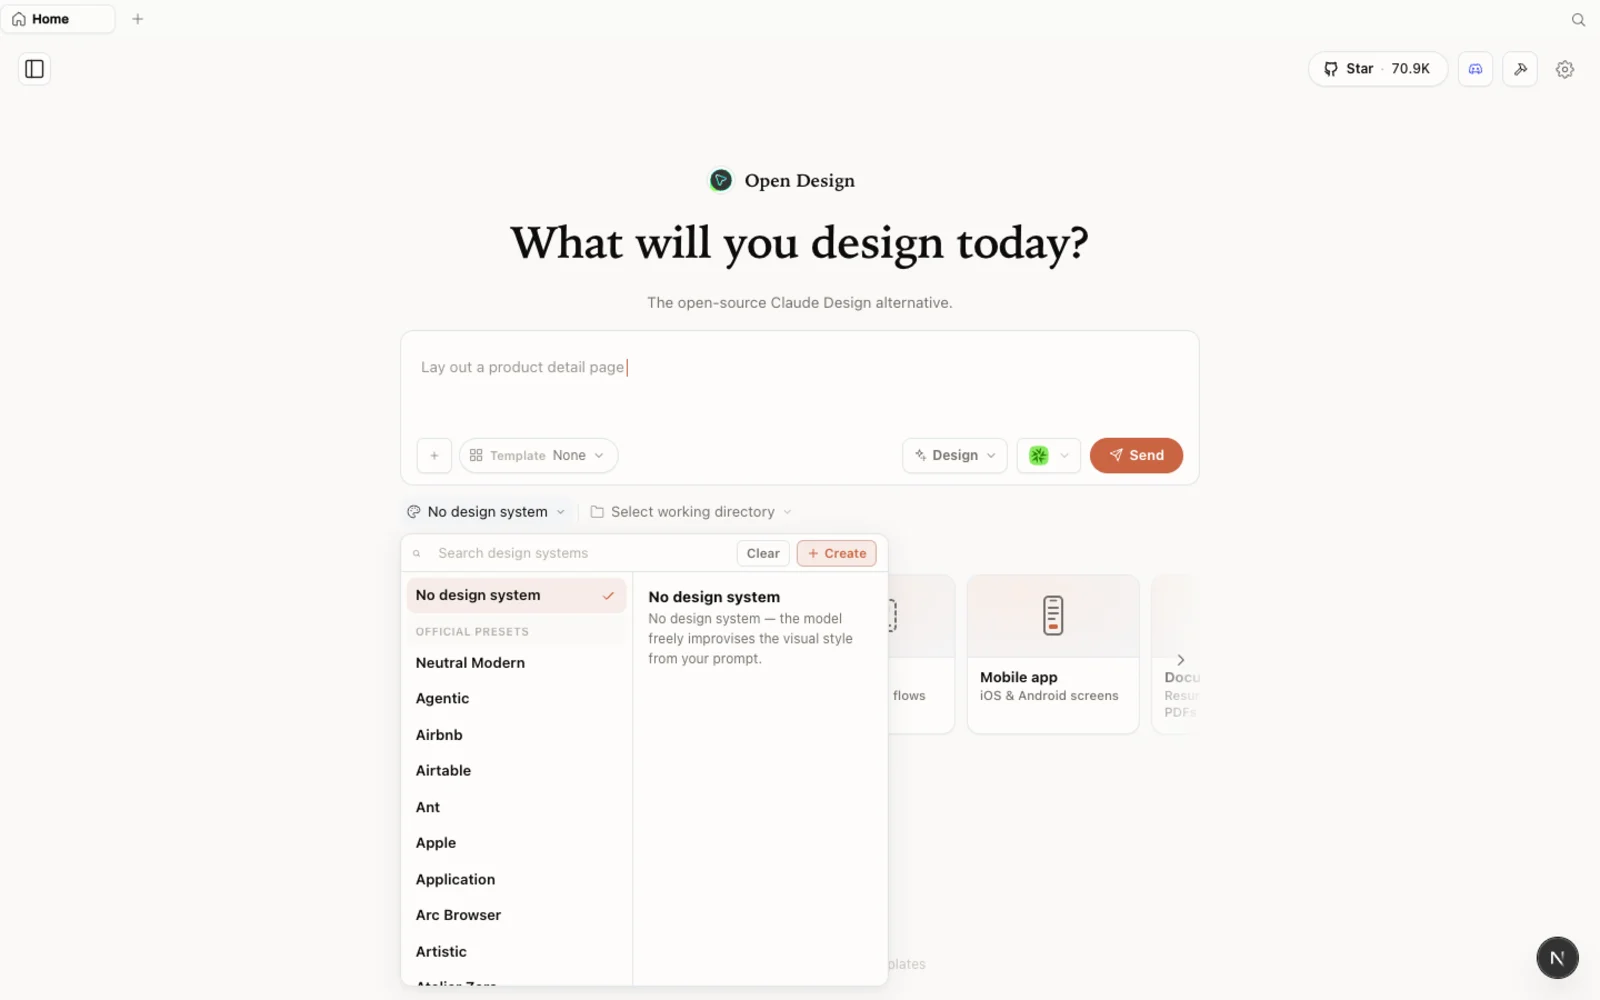 The design-systems library: each entry breaks a real brand down into palette, typography, components, and visual atmosphere you can reuse.
- Prompt the structure, not just the vibe. Sean tells it exactly which sections to build — eleven of them — and pastes the executive summary from his PRD (product vision, problem statement, target user, proposed solution, primary features) so the copy has real context to work from.
- Answer the discovery questions. Just like Claude Design, Open Design asks clarifying questions before it writes. Here it reaches for its SaaS landing-page skill to execute — and because skills are just files, you could load your own copywriting guidelines or section structure as a skill instead.
- Let it run. About five minutes later he has a professional first pass — a real conversion-oriented structure, a clean comparison table, a nicely styled case-study card, a solid FAQ.
Want a different feel? Sean reruns the exact same brief with a brutalist tone instead of editorial and gets a meaningfully different design — same structure, different skin, because the design system does the heavy lifting.
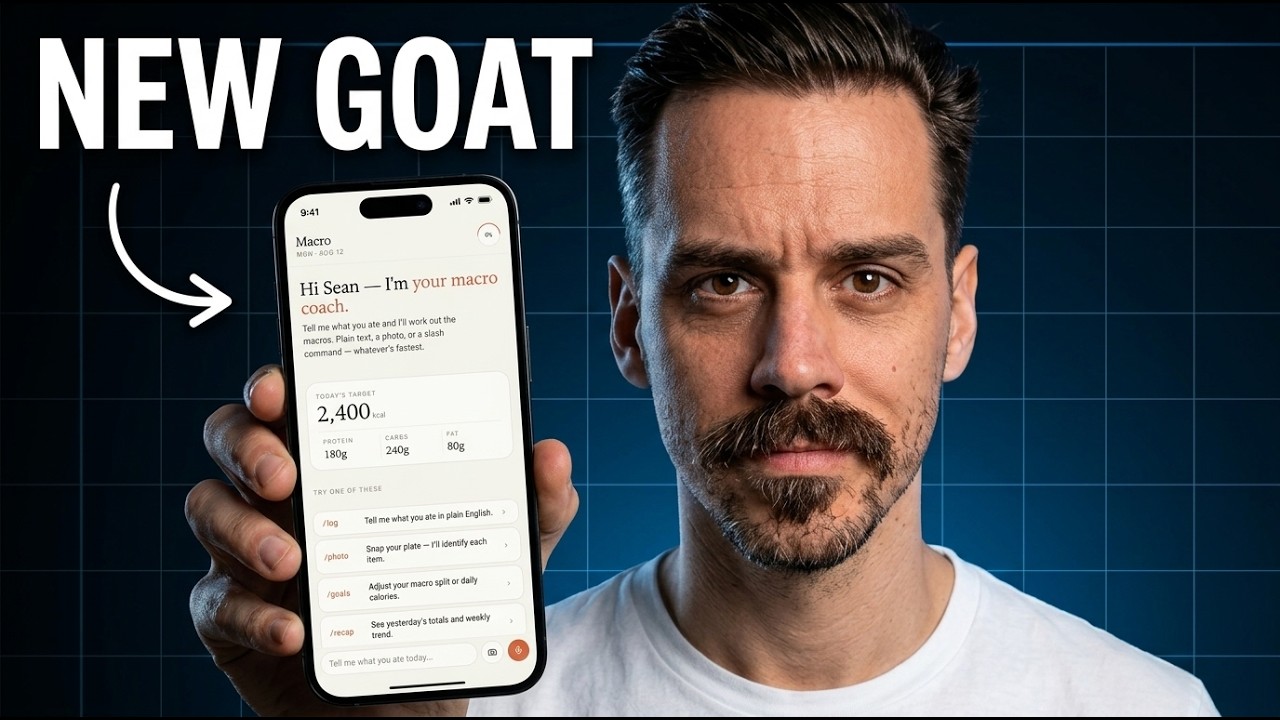
Step 3 — Build a mobile app, screen by screen
For the mobile demo, Sean works one screen at a time. He keeps the same Anthropic design system, then for each screen pastes a prompt built from his PRD — a home feed, a “fill the gaps” recommendation screen, an ad-hoc food log. The agent asks its clarifying questions, mocks up an iOS layout, and adheres to the chosen design system across all three screens.
The lesson: how you prompt the UX is most of the result. When he reframes the same app as a chat-first coaching interface, he gets a wildly different — but still coherent — set of screens. The design system keeps it on-brand; your prompt decides the paradigm.
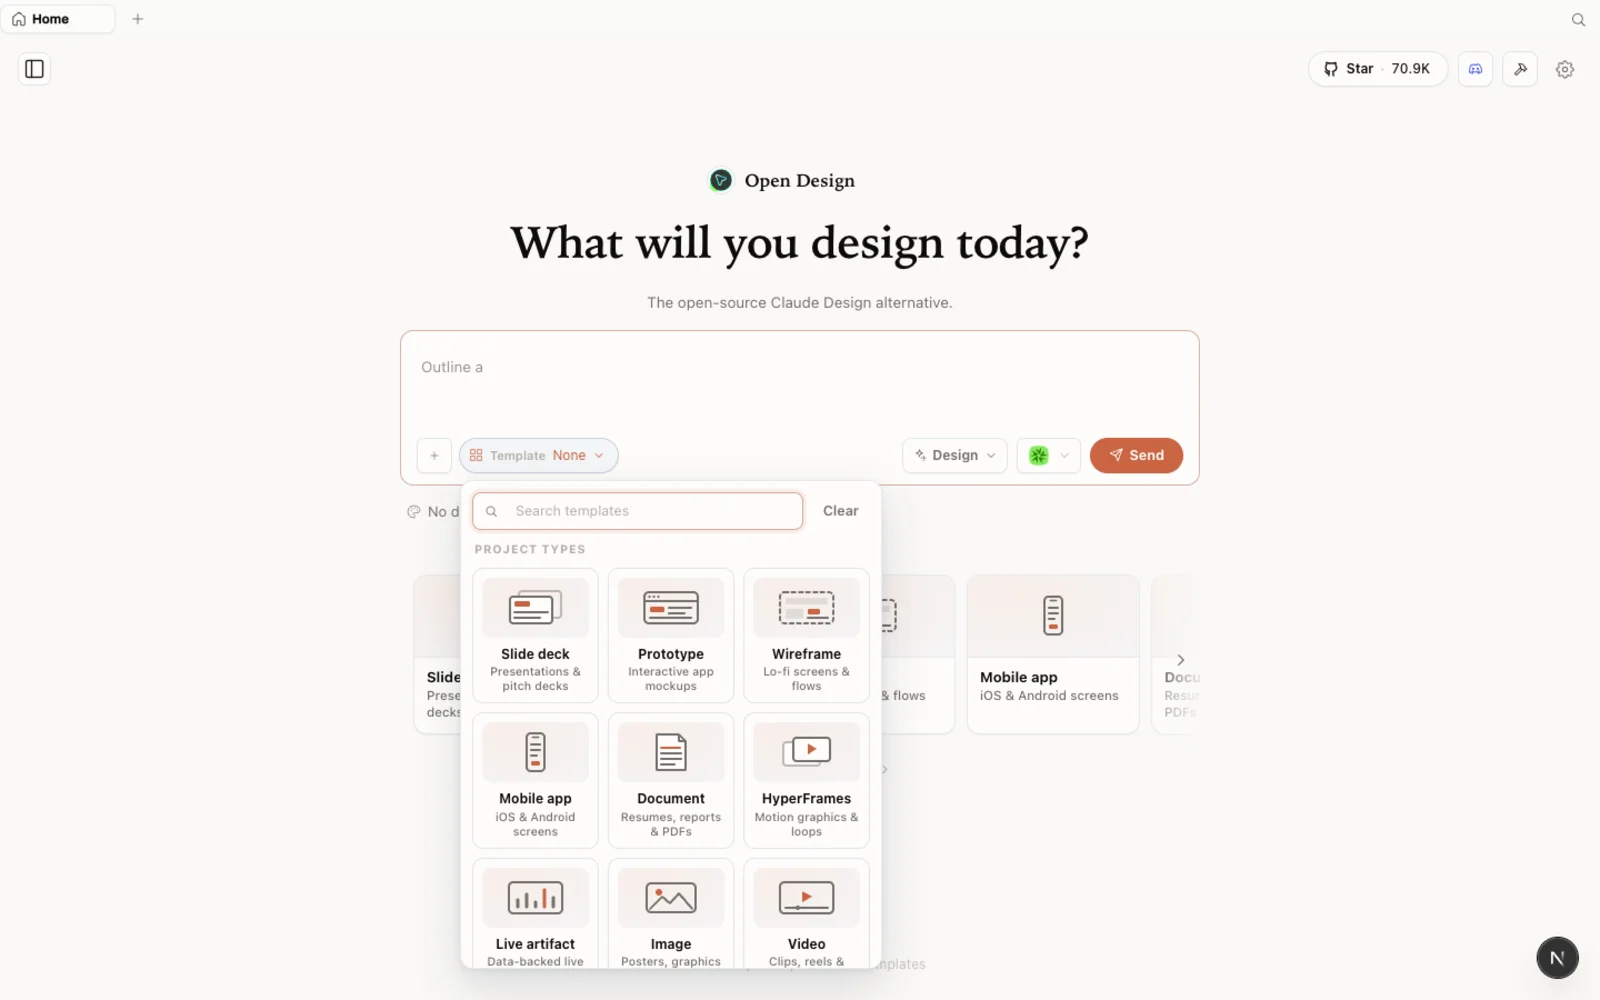 The templates library: prototype, slide, image, and video starting points you can filter by type and fork to begin.
Step 4 — Go multimodal: screens to desktop app
The last demo shows the multimodal trick. Sean screenshots his three mobile screens, drops them into a new chat, and gives an open-ended ask: “mock up a web app version of this core functionality.” Five minutes later he has a clean three-pane desktop translation — navigation on the left, the working canvas in the middle, a progress view on the right — with the slash-command interactions mocked up too.
Even a vague prompt plus reference images gets you a usable starting point. With a proper spec it gets sharper, but the point stands: you can move fluidly between surfaces.
Tips
- Always start from a design system. It’s the single biggest lever against the AI-slop look.
- Prompt the structure explicitly. List the sections or screens; paste real context from a PRD so the copy isn’t hollow.
- Lean on skills — and write your own. Skills are just files; load your copywriting rules or UX paradigms directly into the workflow.
- Iterate by conversation. Different UX framing yields very different results; that’s a feature, so try a few.
- Use reference images. Screenshot existing screens and drop them in to translate across surfaces.
- Remember the output is HTML. It’s built to drop into a project you’ve already started.
FAQ
Do I have to use a specific model? No. Open Design drives whatever agent you’ve configured — Claude Code, Codex, Cursor, Gemini, OpenCode, and more — or your own API key. No provider lock-in.
How is this different from Claude Design? Same familiar feel, but free, open-source, local-first, model-agnostic, and far more customizable — you can add your own skills and processes. Plus image and video generation a single-provider tool doesn’t give you.
Can I merge what I build into an existing app? Yes — outputs are HTML files, so they’re meant to drop into a project you’ve already started. Sean covers spec-driven merge workflows in a companion video.
Is it free? The app is open source under Apache-2.0 and free to run locally. You only pay for the model and media usage of whichever agent and providers you connect.
This written guide is based on Sean Kochel’s hands-on demos. Watch the full video above, and subscribe to Sean Kochel for more AI build workflows.