
Open Design in 20 Minutes — Full Setup + Demo
A complete getting-started walkthrough — install Open Design, connect your coding agent, tour the workspace, and build your first high-fidelity prototype. Based on CodingMenace's hands-on first-impressions video.
This guide walks you through your first 20 minutes with Open Design — from a clean install to your first generated prototype. It follows the path CodingMenace (Dennis) took in his hands-on first-impressions video, rewritten and updated to match the current release so you can follow along step by step. Watch the video above for the live walkthrough, or read on for the written version.
 Open Design positions itself as the open-source Claude Design alternative — desktop-first, agent-native, Apache-2.0.
What is Open Design?
Open Design is an open-source, local-first design platform — an agent-native alternative to Claude Design and Figma. Instead of locking you into one model provider, it runs on top of the coding agent you already use: Claude Code, Codex, Cursor, Gemini, Copilot, OpenCode, and a dozen more. It is “bring your own agent” rather than just bring your own key.
A few things that make it worth a look:
- Open source, Apache-2.0 — clone it, self-host it, read every line.
- Runs locally — your projects live in your own folders on your machine, not in someone else’s cloud.
- Agent-pluggable — 21+ coding agents are supported; you pick which CLI drives generation.
- More than prototypes — prototypes, live artifacts, slide decks, magazine layouts, image generation, and even video, all from one workspace.
- A deep library of design systems and skills built in, so you are not starting from a blank canvas.
If you have used Claude Design, the look and feel will be instantly familiar — Open Design deliberately keeps the same calm aesthetic, then adds capabilities on top.
Before you start
You have three ways to install Open Design. Pick the one that fits you:
| Path | Best for | Requirements |
|---|---|---|
| Desktop app | Most people — zero config | None. Just download and open. |
| Run from source | Developers who want to read or modify the code | Node ~24, pnpm 10.33.x |
| Install into your agent | People who live in the terminal | An existing coding-agent CLI |
The video uses the run-from-source path, but the desktop app is the recommended route today — it needs no Node, no pnpm, and no clone.
Step 1 — Install Open Design
Option A — Desktop app (recommended, zero config)
Go to open-design.ai and click Download desktop. Builds are available for macOS (Apple Silicon and Intel), Windows (x64), and Linux (AppImage). After installing, the app auto-detects every coding-agent CLI already on your PATH and loads the built-in skills and design systems for you.
Option B — Run from source
If you would rather run it from the repository — as Dennis does in the video — you only need three commands:
git clone https://github.com/nexu-io/open-design.git
cd open-design
corepack enable && pnpm install
pnpm tools-dev run web
Then open the local URL it prints. You need Node ~24 and pnpm 10.33.x; Corepack will select the pinned pnpm version for you.
Option C — Install into your coding agent
To use Open Design without ever opening the GUI — calling it as a skill or MCP server inside your agent — run:
curl -fsSL https://open-design.ai/install.sh | sh -s <agent>
# <agent> = claude | codex | cursor | copilot | gemini | opencode | …
Then, inside the agent, just ask: Use open-design to generate a landing page with the Linear design system.
Step 2 — First run: connect your coding agent
The first time you launch Open Design, it scans your machine and shows you every local CLI it found — Claude Code, OpenCode, Copilot CLI, and others. This is the “bring your own agent” step.
- Pick a default agent and model. Let the installed CLI drive generation, or force a specific model (for example, Claude Opus) for this project.
- Add media providers (optional). Want to generate images, video, or audio? Add your own API keys for providers like OpenAI (gpt-image), MiniMax, ElevenLabs, fal, Suno, and more. This is where bring-your-own-key comes in.
- Connect MCP services (optional). Wire in connectors such as Composio if you want the agent to pull data from other sources.
- Toggle skills and design systems. Enable only the capabilities you need for the kind of work you are doing — prototypes, slide decks, mobile apps, meeting notes, and so on.
You can change any of these later, so keep it simple on the first pass.
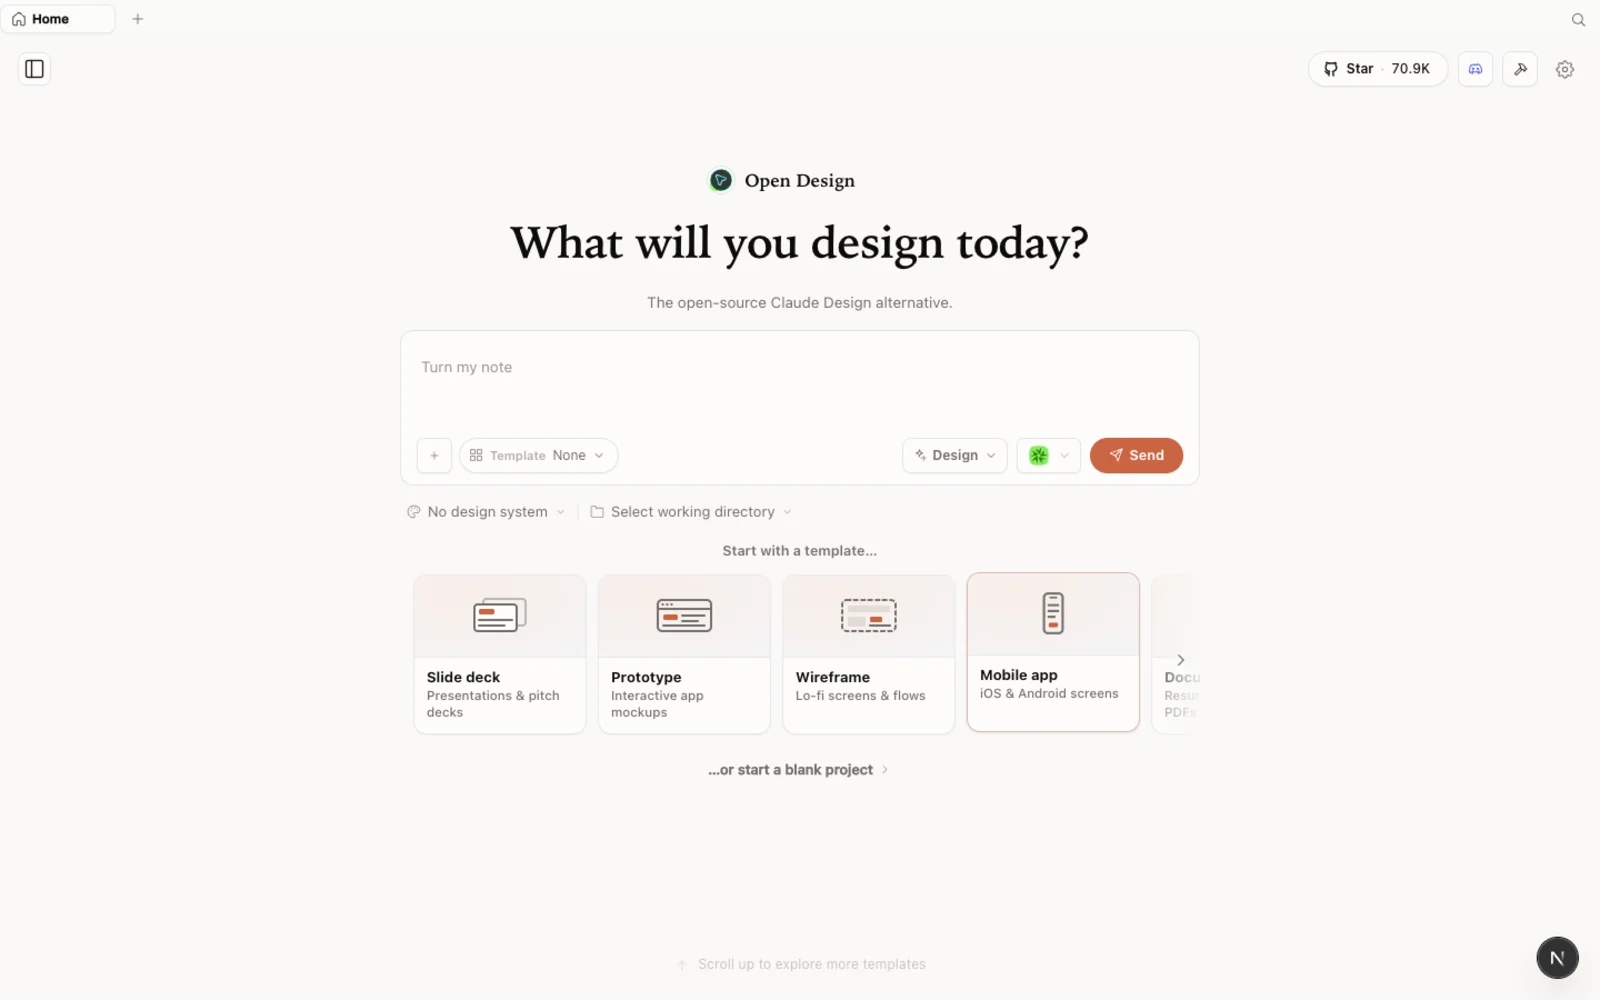
Step 3 — Explore the workspace
Open Design keeps your work project-scoped: when you run it against a folder, the designs you create live inside that project directory. Switch folders and you switch projects.
Inside a project you can create prototypes, live artifacts, slide decks, and animations. For prototypes you choose between two fidelities:
- Wireframe — the bare structure: boxes and shapes to block out layout fast.
- High fidelity — a full, styled prototype of the page you are building.
One key difference from Claude Design: you are not forced to define a design system first. Open Design ships sensible defaults and a gallery of starting points, so you can begin from an existing design system — or none at all.
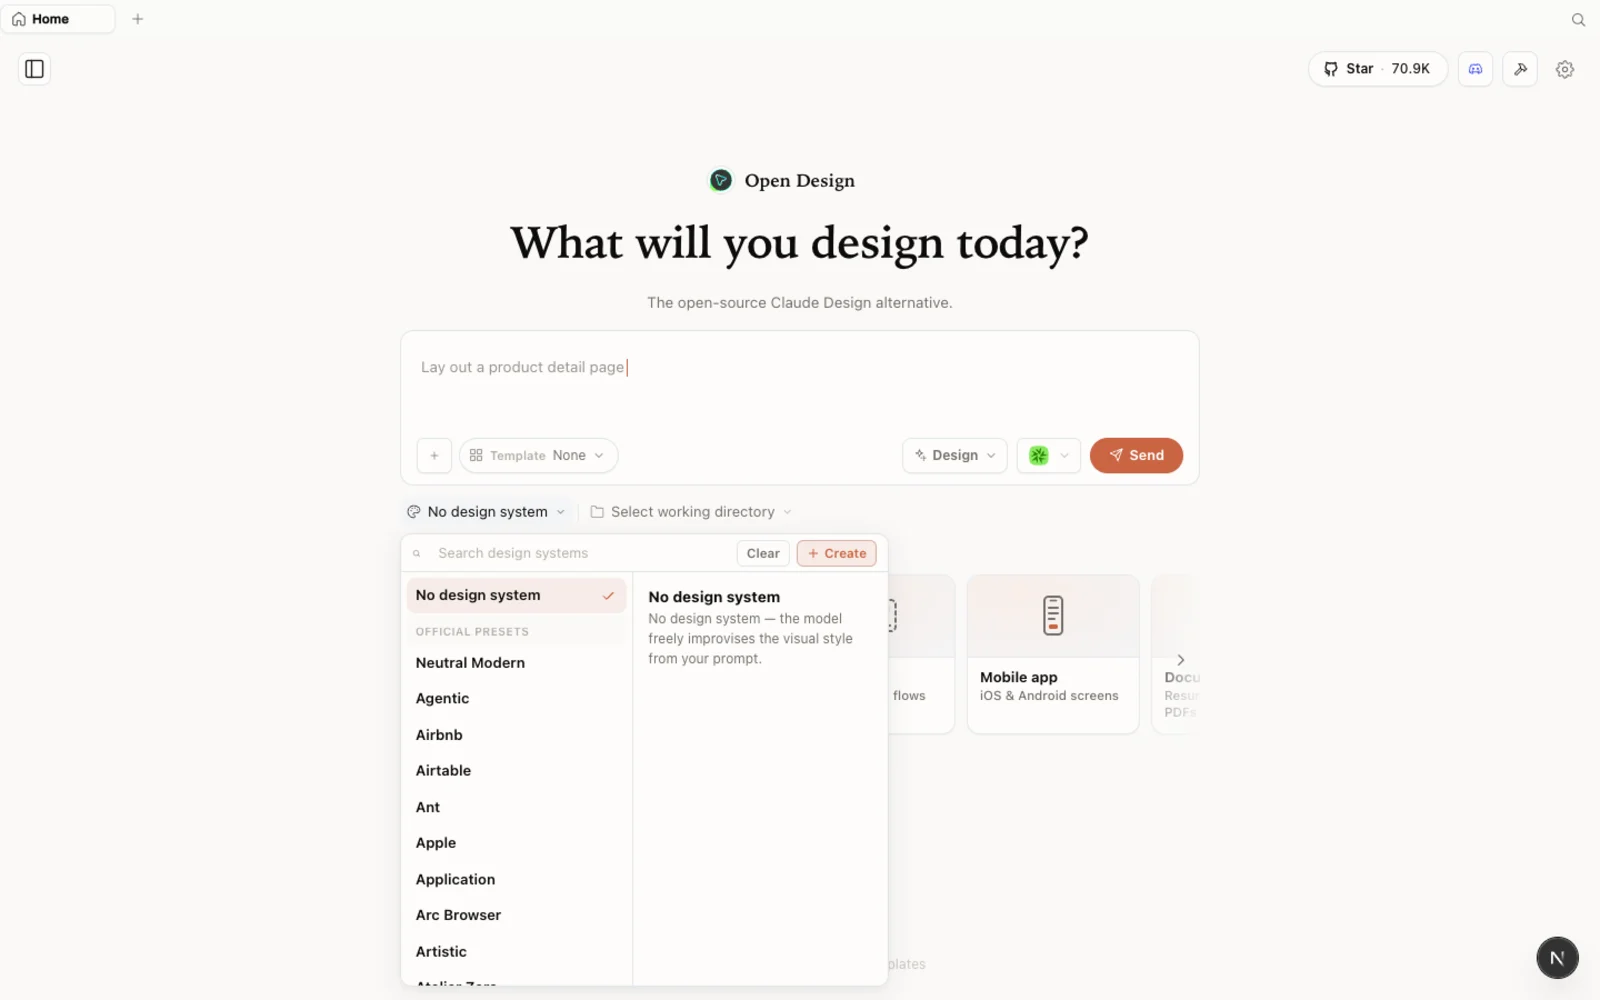 The design-systems library: real-world brand starting points (Agentic, Airbnb, Airtable, and more) you can snap into any project.
The marketplace goes well beyond brand systems. The templates library covers prototypes, slides, and both image and video generation — filter by type and fork any one as your starting point.
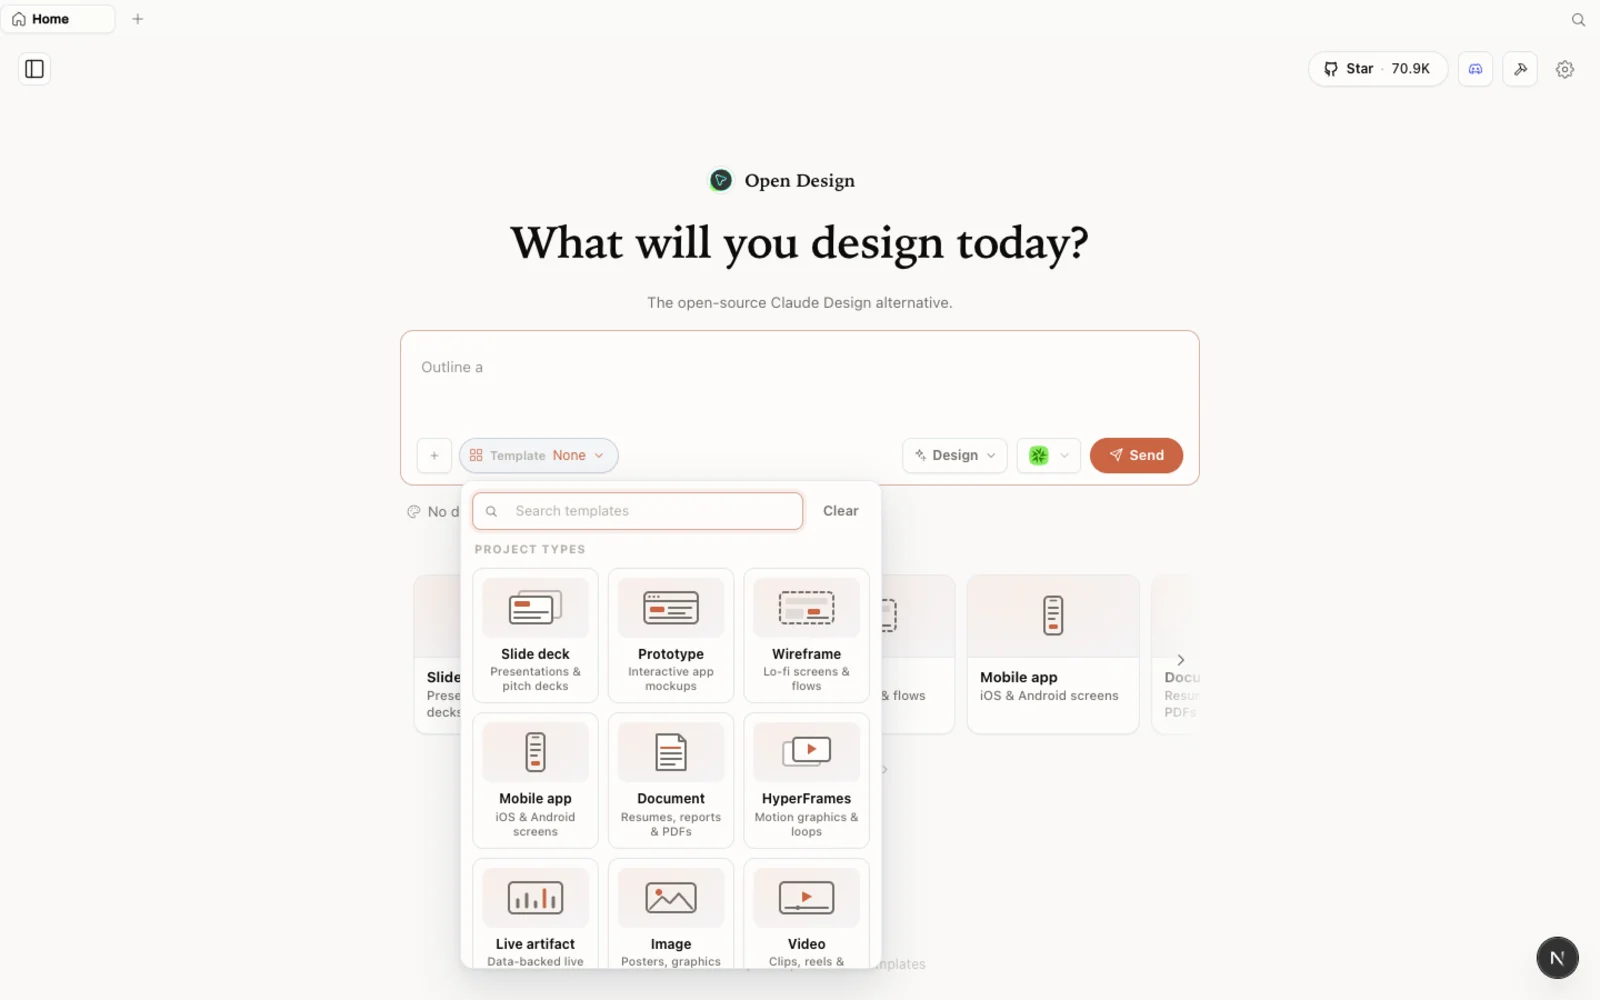 Templates: prototype, slide, image, and video starting points — filter by type and fork to begin.
You can browse the full plugin library on the web at open-design.ai/plugins before you install anything.
Step 4 — Build your first prototype
Now the fun part. In the video, Dennis imports an existing Claude Design project and asks Open Design to build a new page for it. Here is the same flow:
- Create a new prototype. Give it a name (Dennis calls his “Expensely”) and choose High fidelity.
- Import your design system. Open Design can import an existing Claude Design ZIP, so your tokens and components carry over. The imported design files appear in the workspace alongside a live preview.
- Write the brief. Dennis prompts it to “create a new page projecting expenses for 12 months using the previous 3 months.” You get the familiar split layout: conversation on the left, preview and design files on the right.
- Answer the clarifying questions. The agent asks a few smart follow-ups — same colors? which fidelity? simple 3-month average? — then plans a to-do list, reads the design system, and builds the artifact (
projections-v2.html). - Iterate on the design. Not happy with the first pass? Ask for a different direction. Dennis asks for “a different look and feel,” picks an editorial direction, and gets a fresh
projections-v3— a genuinely different design built from the same data and design system.
The result is a real, interactive prototype: click through the charts and pages, then export or hand off — all built from the design system you imported.
Tips for getting more out of it
- Start with high fidelity when you want to see the real thing; use wireframe to block out structure quickly.
- Your designs stay with the project folder — organize work by running Open Design against the right directory.
- Bring your own media keys only for the providers you actually use; you do not need all of them.
- You do not need a design system to start. Begin from a built-in one, import a Claude Design ZIP, or let Open Design infer defaults.
FAQ
Is Open Design free? Yes — it is open source under the Apache-2.0 license. You can run it locally for free; you only pay for the model/API usage of whichever agent and media providers you connect.
Which coding agents does it support? 21+ agents, including Claude Code, Codex, Cursor, Gemini, GitHub Copilot, and OpenCode. Open Design detects the CLIs already installed on your machine.
Do I have to create a design system before I can design? No. Unlike Claude Design, Open Design gives you working defaults and a gallery of starting points. You can bring your own design system when you want one.
How is it different from Claude Design? Same familiar feel, but open-source, local-first, and agent-pluggable — plus extra capabilities like slide decks, magazine layouts, image generation, and video.
This written guide is based on CodingMenace’s first-impressions walkthrough. Watch the full video above, and subscribe to CodingMenace for more hands-on AI-tool videos.