
BYE Claude Design! This is the BEST Open Source AI UI Generator
Install and run Open Design on Windows 11 — the simple native desktop build, plus the from-source route through WSL with Node 24 and pnpm. Run the open-source AI UI generator locally, no cloud subscription. Based on AI Automation's walkthrough.
This guide is for Windows users who want to run Open Design on their own machine — no cloud account, no monthly credits to burn through. It follows the path AI Automation takes in their Windows install walkthrough, rewritten and brought up to date with the current release so you can follow along command by command. Watch the video above for the live run, or read on for the written version.
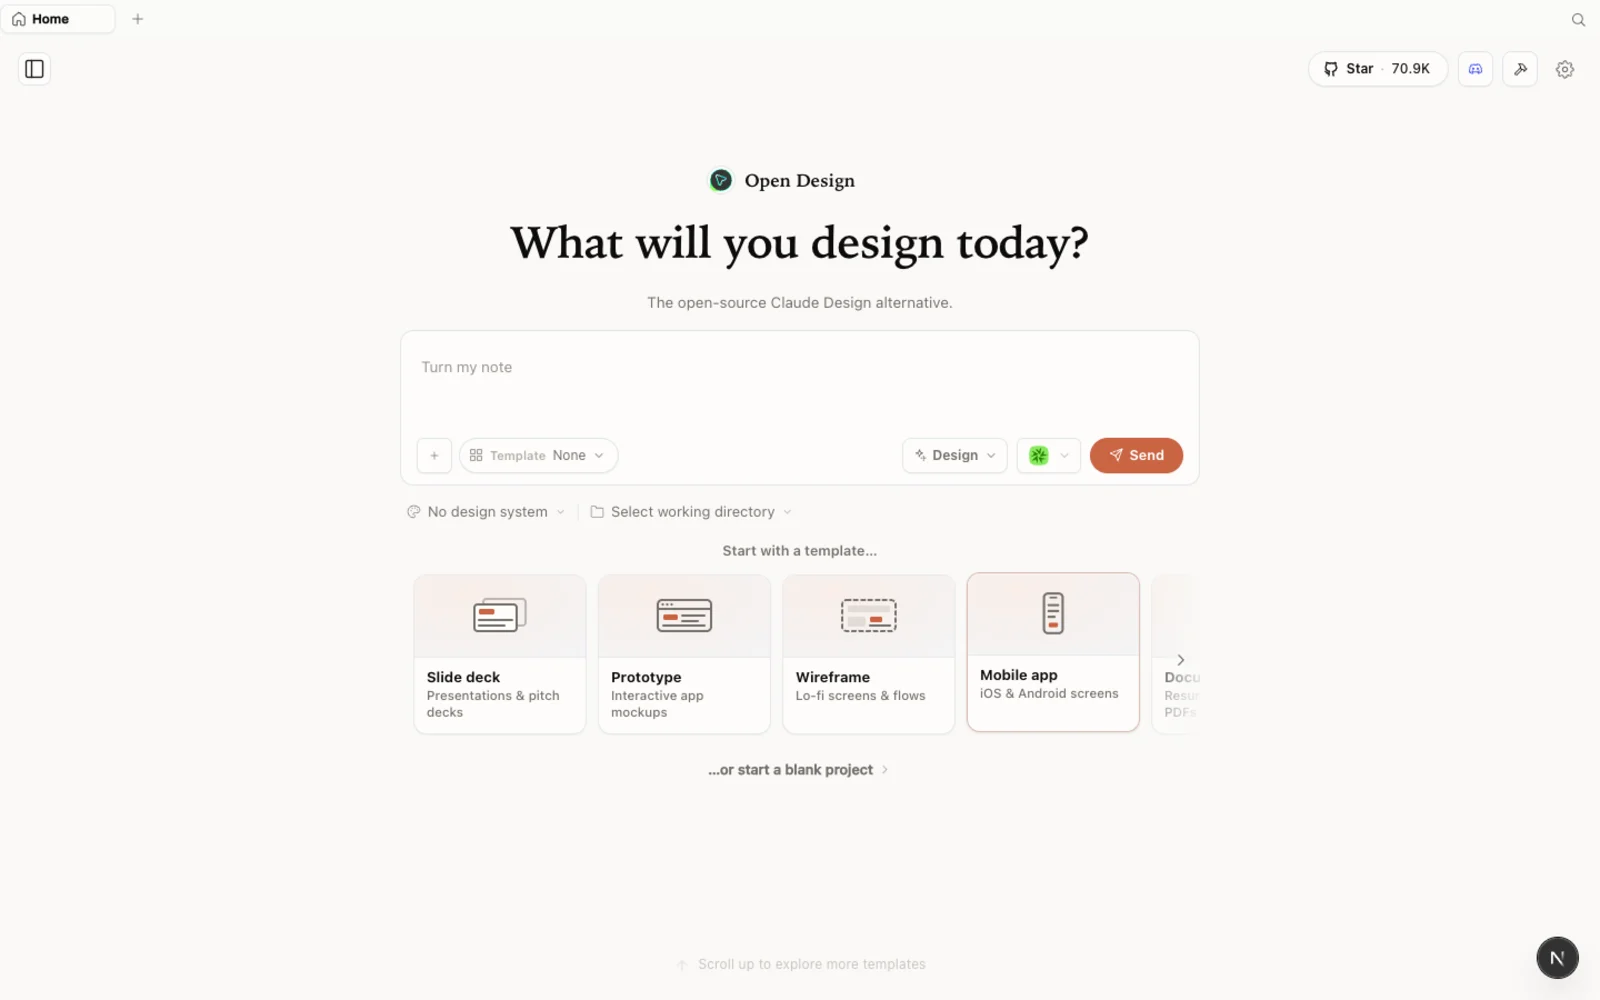 Open Design running locally on Windows: an open-source, agent-native design workspace you fully control.
What is Open Design?
Open Design is an open-source, local-first design platform — an agent-native alternative to Claude Design and Figma. Instead of locking you into one model provider, it runs on top of the coding agent you already use: Claude Code, Codex, Cursor, Gemini, Copilot, OpenCode, and a dozen more. It is “bring your own agent” rather than just bring your own key.
A few things that make it worth a look:
- Open source, Apache-2.0 — clone it, self-host it, read every line.
- Runs locally — your projects live in your own folders on your machine, not in someone else’s cloud.
- Agent-pluggable — 21+ coding agents are supported; you pick which CLI drives generation, and the quality of the output tracks the model you choose.
- More than prototypes — prototypes, live artifacts, slide decks, magazine layouts, image generation, and even video, all from one workspace.
- A built-in library of design systems and templates, so you are not starting from a blank canvas.
If you have used Claude Design, the feel will be instantly familiar — Open Design keeps the same calm aesthetic, then adds capabilities (and your choice of model) on top.
Before you start
You have three ways to install Open Design on Windows. Pick the one that fits you:
| Path | Best for | Requirements |
|---|---|---|
| Desktop app (Windows x64) | Most Windows users — zero config | None. Download and open. |
| Run from source (WSL) | Developers who want to read or modify the code | WSL2 + Ubuntu, Node ~24, pnpm 10.33.x |
| Install into your agent | People who live in the terminal | An existing coding-agent CLI |
The video uses the WSL-from-source path, which is great if you want to live inside the repo. But for most people the native Windows desktop build is the recommended route — there is a Windows (x64) installer that needs no WSL, no Node, and no clone. This guide covers both; the WSL walkthrough below is for when you specifically want the source route.
Step 1 — Set up WSL
If you only want the desktop app, skip ahead to Step 2, Option A. If you want the from-source route, you first need a Linux environment inside Windows. That is exactly what WSL (Windows Subsystem for Linux) provides — a real Ubuntu shell running alongside Windows, no dual-boot, no virtual machine to babysit.
1. Install WSL and Ubuntu. Open PowerShell and run wsl --install — this enables WSL2 and installs Ubuntu by default. Reboot if Windows asks, then launch Ubuntu from the Start menu and set your Linux username and password the first time it opens. (Already have Ubuntu from another tool? Reuse it — no need to repeat this.)
2. Update the base packages. Inside the Ubuntu shell, refresh the package index and install the essentials:
sudo apt update && sudo apt install -y curl gitTroubleshooting tip from the video: if a later step throws a strange error, restart your Linux instance cleanly — from PowerShell run
wsl --shutdown, then reopen Ubuntu. A fresh start clears most first-run hiccups.
3. Install Node 24. The from-source build targets Node ~24. A clean Ubuntu has no nvm yet, so install it first, then use it to get Node 24:
curl -o- https://raw.githubusercontent.com/nvm-sh/nvm/v0.40.3/install.sh | bash
source ~/.bashrc            # load nvm into the current shell
nvm install 24
nvm use 24
node --version              # should print v24.x
With Ubuntu set up and Node 24 active, you are ready to install Open Design.
Step 2 — Install Open Design
Option A — Windows desktop app (recommended, zero config)
Go to open-design.ai and click Download desktop. There is a native Windows (x64) build (alongside macOS and Linux). Run the installer, open the app, and it auto-detects every coding-agent CLI already on your PATH, then loads the built-in skills and design systems for you. No WSL, no terminal — this is the simplest path on Windows.
Option B — Run from source (inside WSL)
This is the route AI Automation demonstrates. Working inside your Ubuntu shell with Node 24 active, clone the repository and start the web runtime:
git clone https://github.com/nexu-io/open-design.git ~/open-design
cd ~/open-design
corepack enable && pnpm install
pnpm tools-dev run web
corepack enable lets Corepack select the pnpm version pinned in the repo (10.33.x), so you do not install pnpm yourself. pnpm install pulls dependencies and compiles native pieces — this can take a couple of minutes on the first run, which is expected, not a failure. pnpm tools-dev run web then boots the local daemon and web server.
When it finishes, the command prints a local URL — copy it and paste it into your Windows browser. WSL forwards the port through to Windows automatically, so the app just opens.
Important: the port is assigned dynamically at launch — read the actual address the command prints. Do not assume a fixed port; the address may differ on your machine and between runs.
Option C — Install into your coding agent (WSL)
Prefer to skip the GUI and call Open Design as an MCP server inside your agent? On WSL there is one extra step first. Linux already ships /usr/bin/od (the octal-dump tool), which shadows Open Design’s own od — so od mcp install … would otherwise fail with “file not found” for mcp/install. Add a small wrapper that points od at your clone and put it first on PATH:
mkdir -p ~/.local/bin
cat > ~/.local/bin/od <<'EOF'
#!/usr/bin/env bash
repo="$HOME/open-design"     # the ~/open-design clone from Option B
cd "$repo" || exit 127
exec corepack pnpm exec od "$@"
EOF
chmod +x ~/.local/bin/od
export PATH="$HOME/.local/bin:$PATH"
hash -r
type -a od                   # Open Design's od should now win
Then wire it into your agent:
od mcp install <agent>
# <agent> = claude | codex | cursor | copilot | gemini | opencode | …
Then, inside the agent, just ask: Use open-design to generate a landing page with the Airbnb design system.
First run: connect your coding agent
The first time the workspace loads, Open Design scans your environment and shows every CLI it found. Because WSL is a real Linux box, it picks up agents installed inside Ubuntu — so a Gemini CLI or other agent living in WSL is detected there. Click rescan if something does not show up yet.
- Pick a default agent and model. Let the installed CLI drive generation, or point it at a specific provider and model. As the video stresses, a stronger model means noticeably better output, so reach for a capable one when the result matters.
- Add media providers (optional). To generate images, video, or audio, paste your own API keys — bring-your-own-key, only for the providers you actually use.
- Connect MCP services (optional). Wire in connectors if you want the agent to pull from other sources.
- Set preferences. Language, appearance, notifications — even a desktop pet. You can change any of this later, so keep the first pass simple.
Explore the workspace
Open Design keeps your work project-scoped: when you run it against a folder, the designs you create live inside that project directory. Your first project list will be empty — that is normal.
Inside a project you can build prototypes, slide decks, images, videos, and more. Two starting points make the blank canvas disappear:
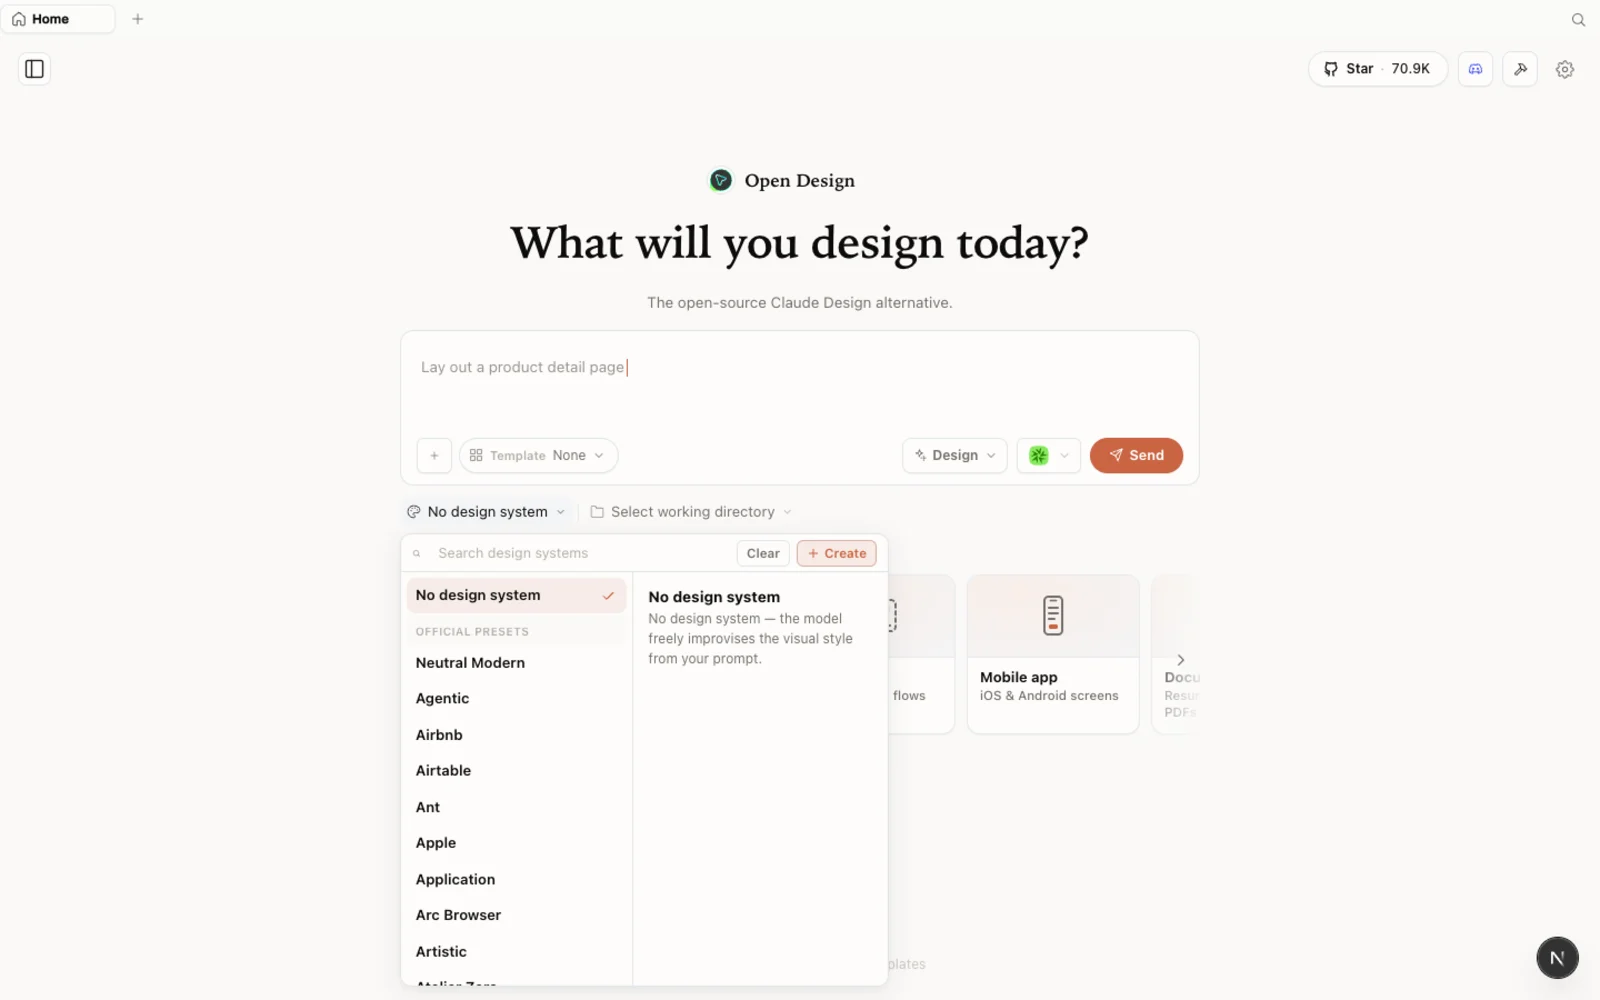 The design-systems library: pick a real brand look — Airbnb, Airtable, and many more — and Open Design carries its tokens, colors, and type into your design.
- Design systems capture a brand’s look as a
DESIGN.mdof tokens — primary and secondary colors, type, spacing. Preview one, and you can build straight on top of it instead of defining a palette from scratch. - Templates cover prototypes, slides, and both image and video generation. Filter by type and fork any one as a head start.
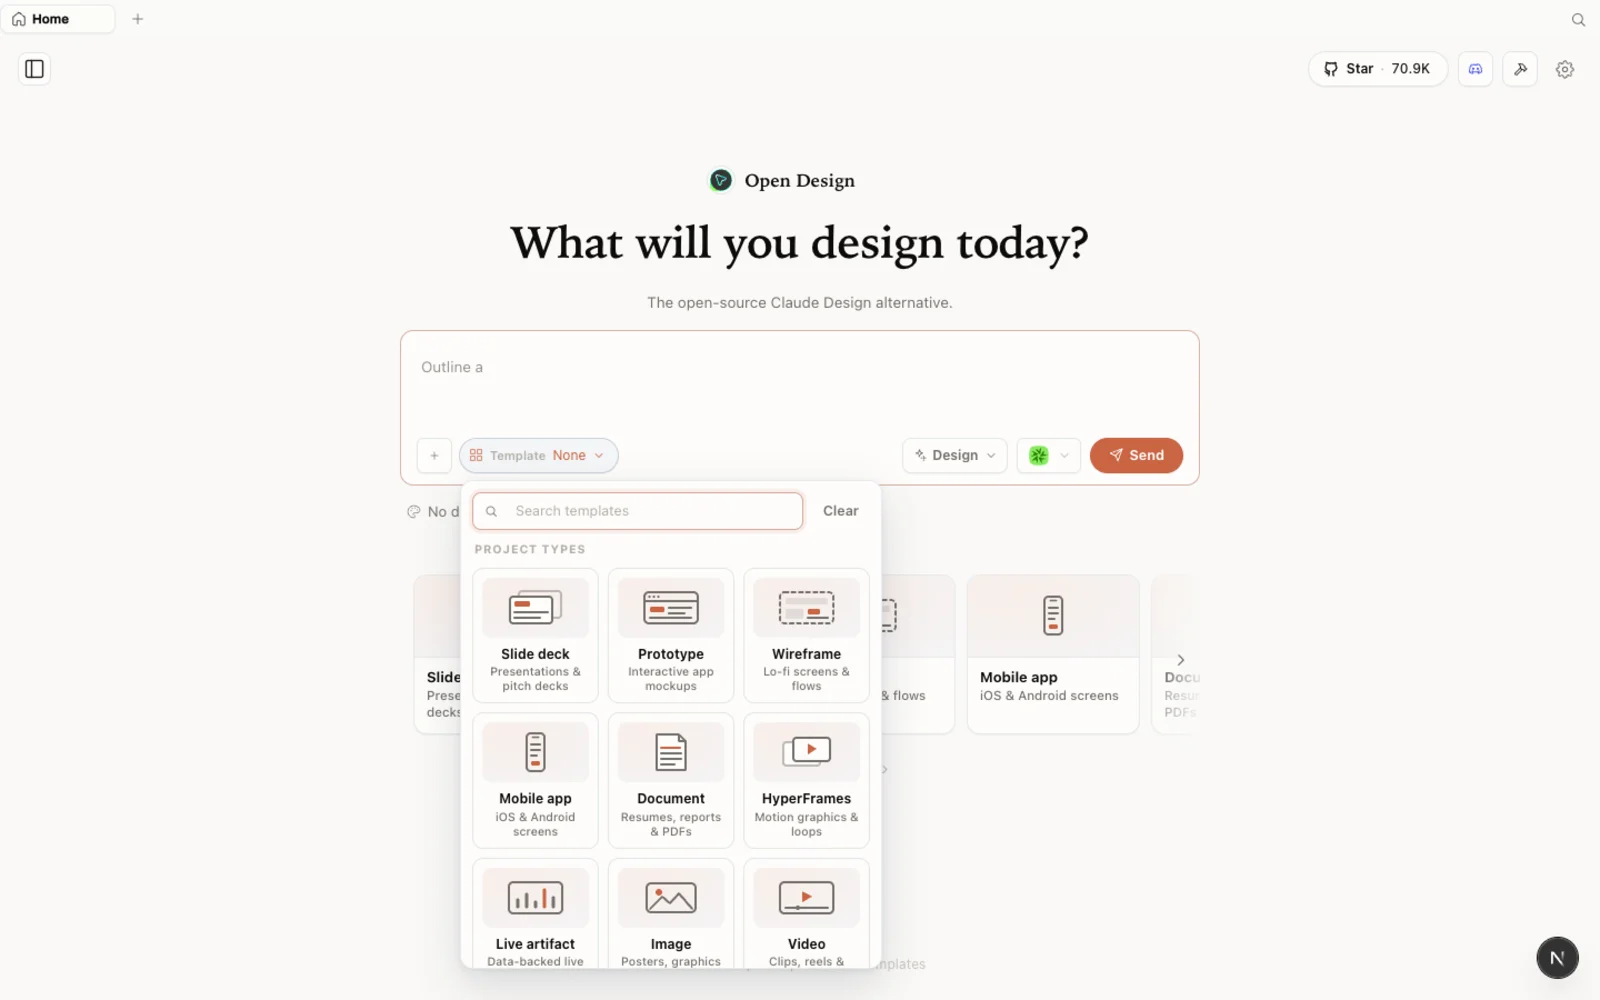 Templates: prototype, slide, image, and video starting points — filter by type and fork to begin.
You can browse the full library on the web at open-design.ai/plugins before installing anything.
Build something
Here is the flow AI Automation runs, rewritten for the current release:
- Pick a design system. Choose one you like — say Airbnb — and open it to inspect its
DESIGN.mdand tokens. - Import it as a starting point. Use Share → Download as ZIP, then in your project choose Import flat design ZIP. The design appears in the workspace, ready to build on.
- Prompt the change you want. Type a plain-language brief — “Can you make the background dark?” — and send it. The agent reads the design system, plans its work, and produces a new version of the artifact.
- Iterate freely. Change fonts, add or remove a logo, upload your own assets and have them placed in the right spots. Each prompt produces a fresh take to keep or discard.
- Export when you are happy. Hit Share and download the result as a ZIP.
The output is a real, editable design driven by the model you connected — so a capable agent pays off directly in what you get back.
Tips for getting more out of it
- Choose a strong model. Output quality tracks the agent you connect — a free model works to learn the flow, but a capable one is worth it for real work.
- Read the printed URL every time. The local address is dynamic; copy what
tools-devprints rather than reusing an old link. - Install your agents where Open Design will look. Running from source in WSL? Install your CLIs inside Ubuntu so the workspace detects them; the desktop app reads your Windows
PATH. - You do not need a design system to start. Begin from a built-in one, import a ZIP, or let Open Design infer defaults. Your designs stay with the project folder, so organize work by running against the right directory.
FAQ
Is Open Design free? Yes — it is open source under the Apache-2.0 license. You can run it locally for free; you only pay for the model/API usage of whichever agent and media providers you connect.
Should I use WSL or the Windows desktop app? For most people, the native Windows (x64) desktop build is simpler — no WSL, no Node, no clone. Use the WSL from-source route when you specifically want to read or modify the code. Note that WSL2 is a primary supported path, while Windows-native is best-effort; if you hit friction with one, try the other.
Which coding agents does it support?
21+ agents, including Claude Code, Codex, Cursor, Gemini, GitHub Copilot, and OpenCode. Open Design detects the CLIs already installed on your machine — inside WSL for the source route, or on your Windows PATH for the desktop app.
How is it different from Claude Design? Same familiar feel, but open-source, local-first, and agent-pluggable — so you are not locked into one model or burning a fixed credit pool. It also goes beyond prototypes with slide decks, magazine layouts, image generation, and video.
This written guide is based on AI Automation’s Windows install walkthrough. Watch the full video above, and subscribe to AI Automation for more hands-on AI-tool videos.